Tutorial · Eyes
How to draw anime eyes, step by step
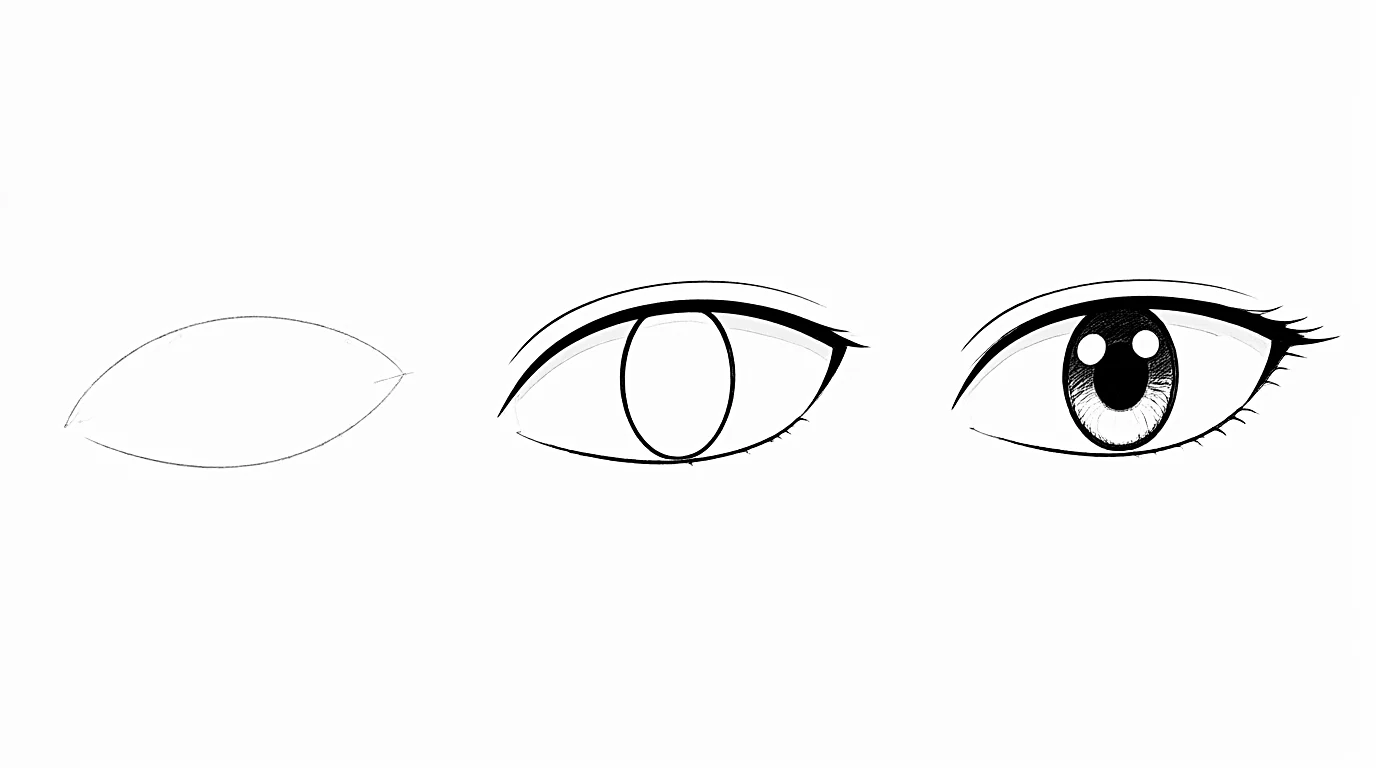
To draw anime eyes, always build them in the same order: a lying almond that sets the size of the eye, a thick upper eyelid over it with a short thin line below, a tall oval iris cut at the top by the eyelid, then a dark pupil and white highlights. Place them on the eye line, halfway down the head, with the width of one eye between them.
- Beginner
- 30 min practice
- 9 min read
- Updated
You'll need
- HB pencil
- 2B or 4B pencil for dark lines
- Eraser
- Printer paper or a sketchbook
Key takeaways
- Build every eye in the same order: the almond, the eyelids, the iris, then the pupil and highlights.
- The upper eyelid is the thickest line and gives the eye its shape; the lower lid is a short, thin, often broken line.
- Place the eyes on the eye line, halfway between the top of the skull and the chin, with one eye's width between them.
- Put the highlights on the same side in both eyes: the light comes from one place.
On this page
- What makes an eye look anime?
- Where do the eyes go on an anime face?
- How to draw anime eyes step by step
- How to draw anime eyes at an angle or from the side
- How to change the eye style for each character
- Male vs. female anime eyes
- How to show emotion with the eyes and eyebrows
- Common mistakes when drawing anime eyes
- FAQ
What makes an eye look anime?
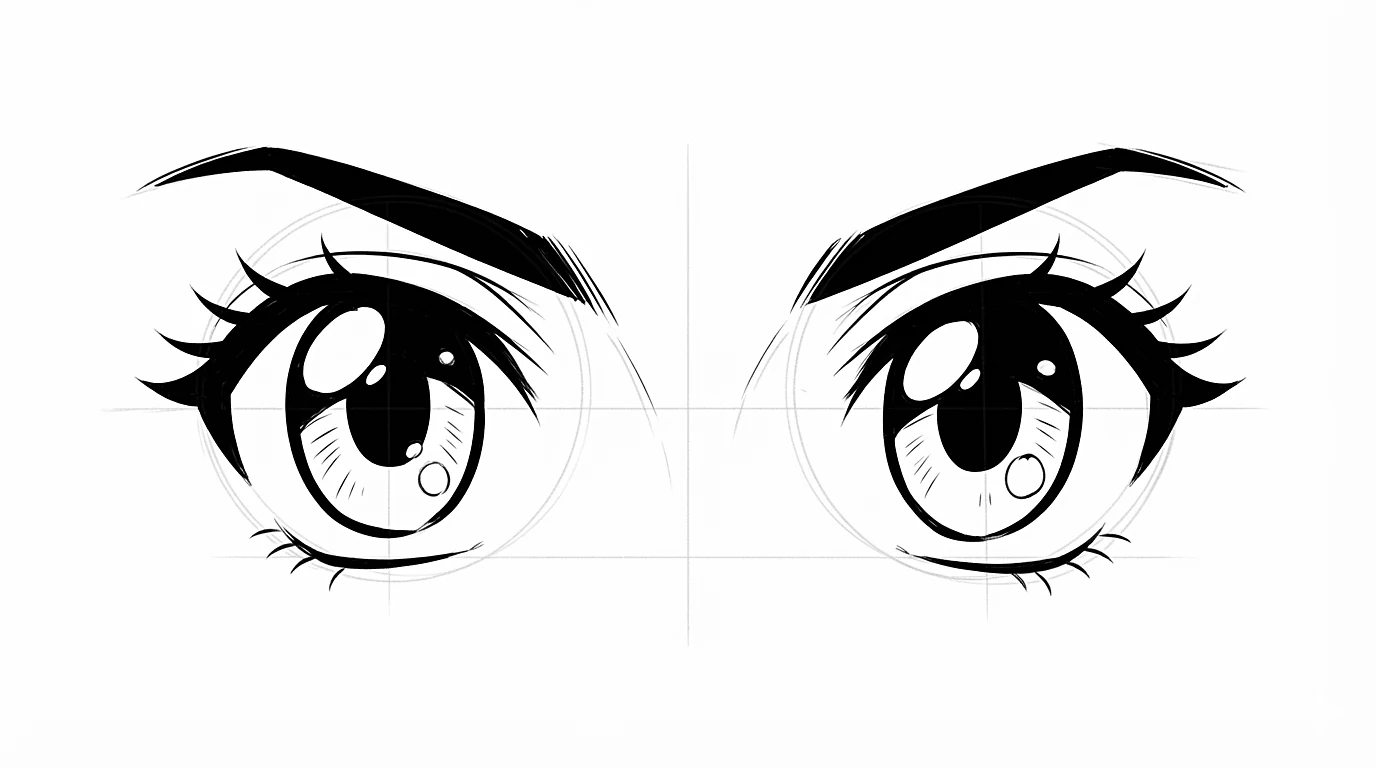
Anime eyes are real eyes simplified into a few strong shapes. Artists keep the lines that read from far away, like the upper eyelid, the iris and the highlights, and leave out most of the rest: the lower lashes, the tear duct, the small folds of skin.
They are also bigger than real eyes, and often set a little lower on the face for young or cute characters. That size leaves room for highlights and emotion, which is why the eyes carry so much of a character's style and personality.
- A thick upper eyelid, like a roof, that often ends in a small flick at the outer corner.
- A short, thin lower lid, often broken: the less of it there is, the lighter the eye looks.
- A tall oval iris, cut at the top by the eyelid and reaching almost down to the lower lid.
- One or two white highlights, placed where the light comes from.
- A few lashes, grouped at the outer corner.
Where do the eyes go on an anime face?
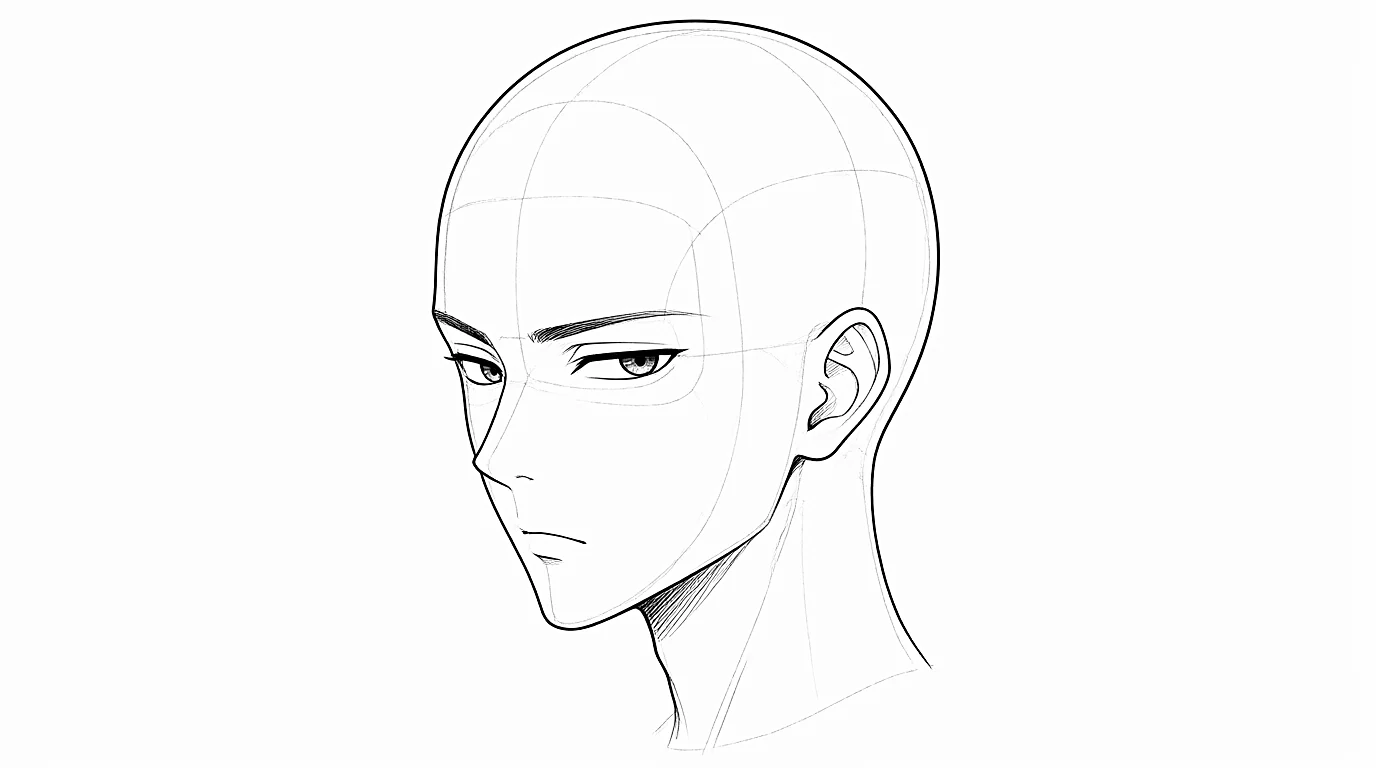
A beautiful eye in the wrong place spoils the whole face, so place the eyes before you draw a single lash. On the built head, draw the eye line halfway between the top of the skull and the chin. The eyes sit on it, with the width of one eye between them.
Lower the eye line a little for a younger character. Spacing changes the character too: more space between the eyes looks soft and childlike, less space looks harsh or grown-up. The eyebrow sits about half an eye above the eye and follows the brow ridge. The anime face tutorial shows how to build the head under these guidelines.
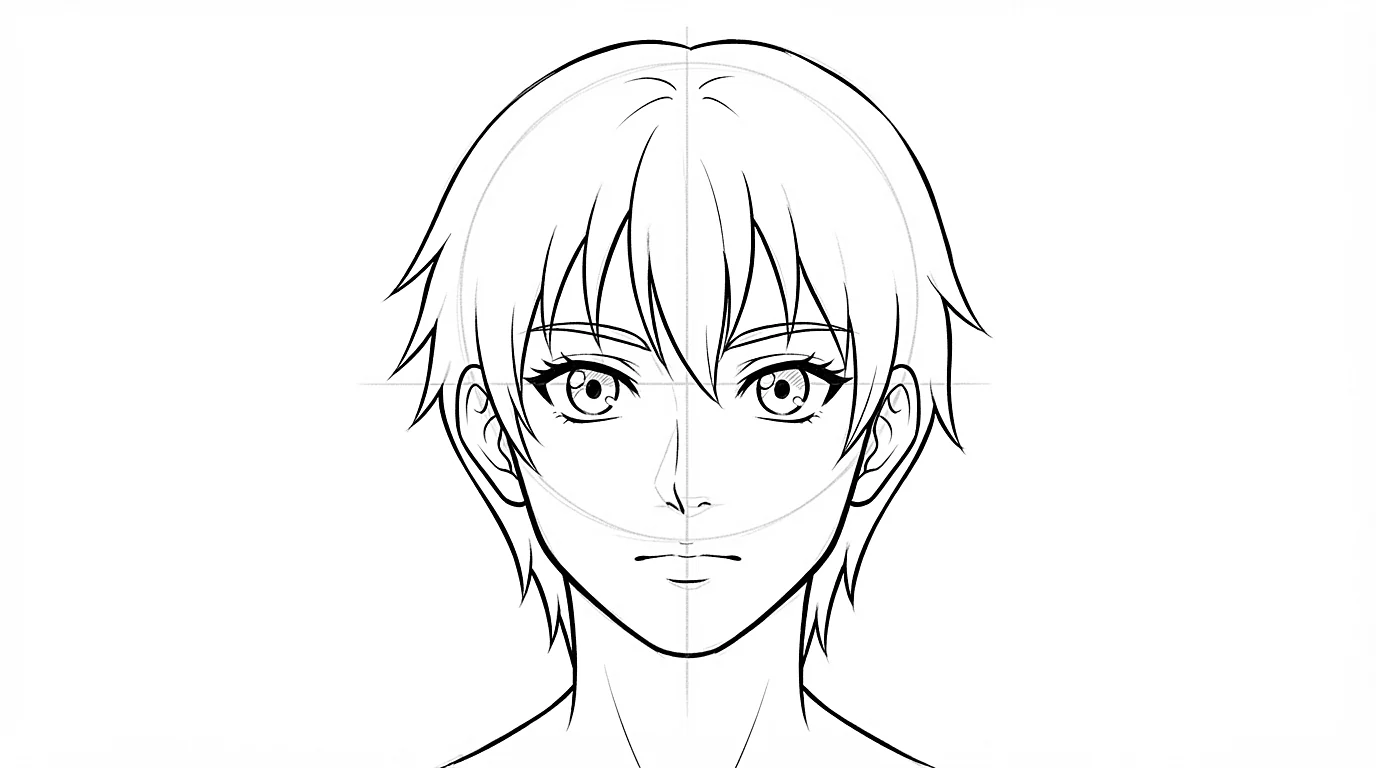
Draw the eye line all the way across the head with a light HB pencil. When the head turns, it follows the curve of the ball, and both eyes follow it.
How to draw anime eyes step by step
A manga eye is always built in the same order: the shape, the eyelids, the iris, the highlights. Draw one eye large, about the size of your palm, so you can see every curve. Once you can draw it, draw it as a pair, going back and forth between the two eyes so they stay the same size.
-
Step 1Draw the guidelines and the almond
Draw a horizontal eye line and a vertical line where the center of the iris will be. On them, sketch a lying almond, a little pointier on the outer side, toward the edge of the face: it sets the size of the eye. Press lightly: you will erase these lines.
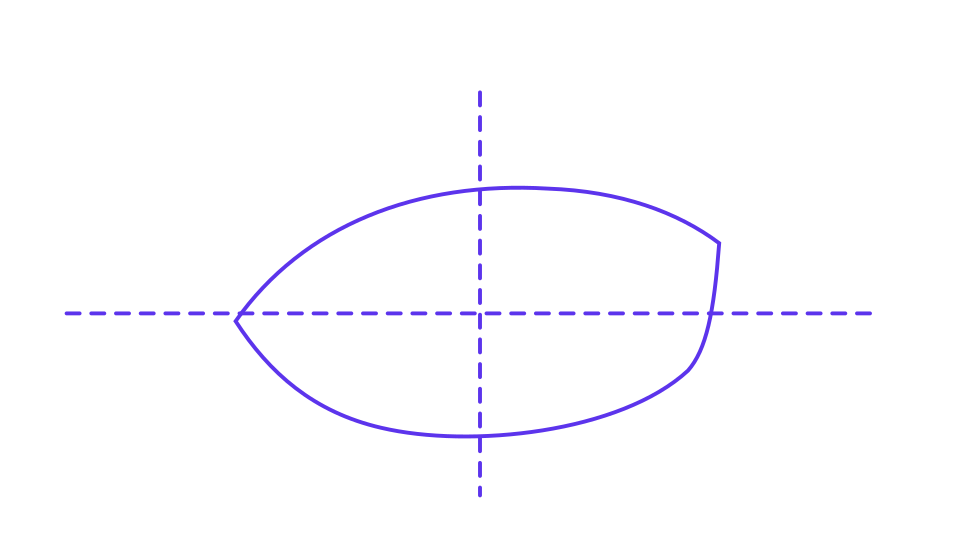
The eye line, the center of the iris and a lying almond that sets the size of the eye. -
Step 2Draw the upper eyelid
Go over the top of the almond with a thick curved line: the upper eyelid, the line that makes a manga eye. Start thin at the inner corner, near the nose, thicken it toward the outer corner and end it with a small flick. It decides the shape of the eye: round, almond or stretched.
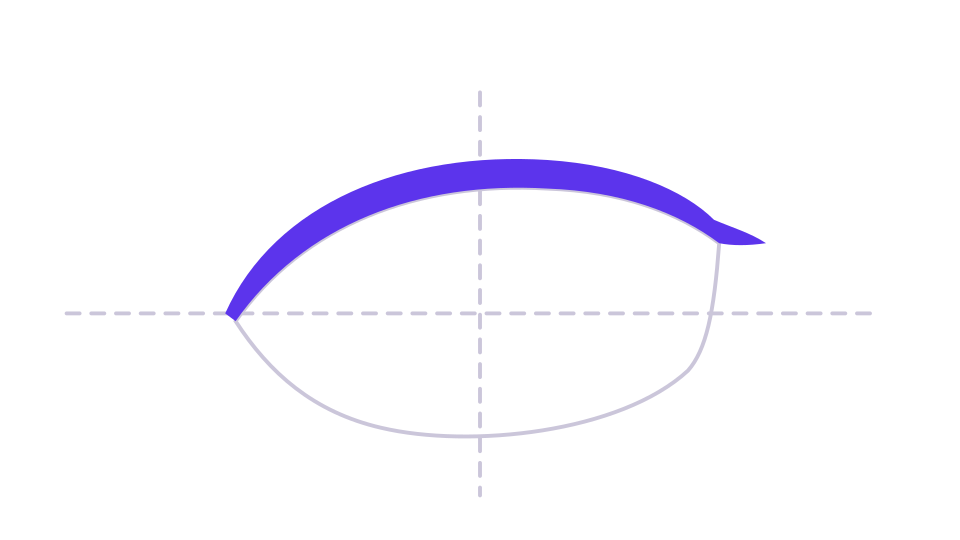
The upper eyelid over the top of the almond: thin at the inner corner, thick toward the outer corner. -
Step 3Add the lower lid
At the bottom of the almond, draw just a short, thin line, curving up toward the outer corner without touching the upper lid. Leave both corners open: an anime eye looks brighter when its outline is not a closed shape.
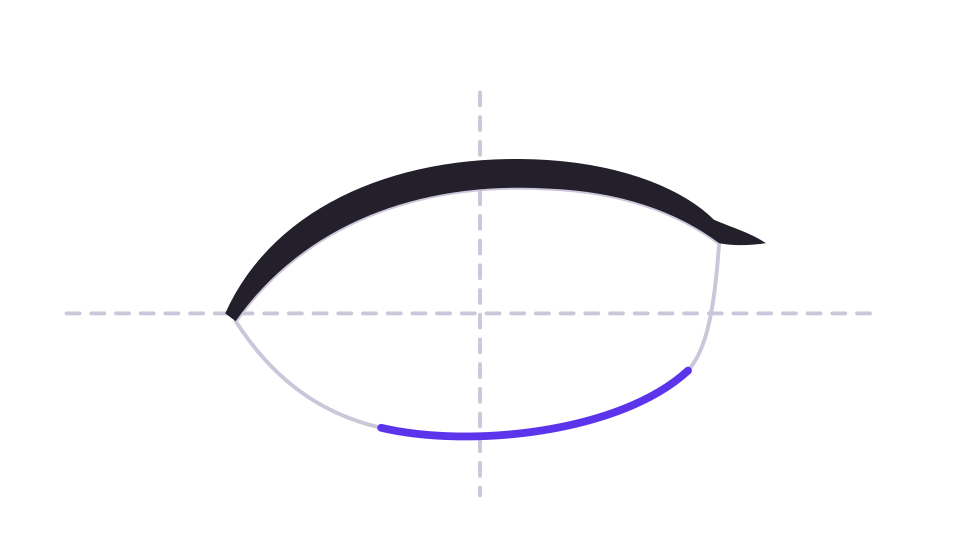
A short lower lid. The gaps at both corners keep the eye open and light. -
Step 4Draw the iris
Draw a big standing oval on the vertical guideline, cut at the top by the eyelid and reaching almost down to the lower lid. Let it touch the upper line: an iris you can see whole, with white all around, makes the character look shocked or staring. A bigger iris looks younger and gentler; a smaller one looks older or more intense.
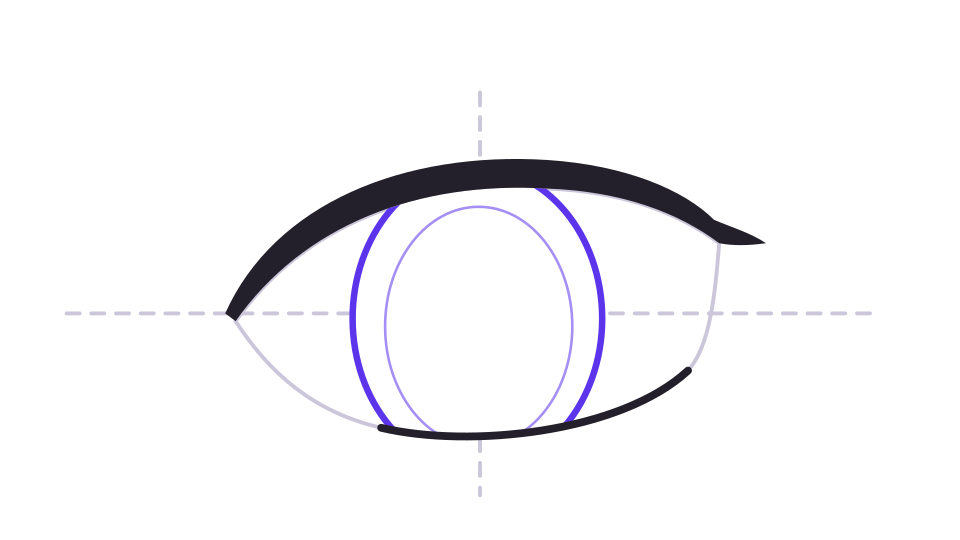
A tall oval iris, with its top tucked under the upper eyelid. -
Step 5Add the pupil and the highlights
Draw a dark pupil in the middle of the iris, then a big white highlight near the top, overlapping the iris and the pupil. A second, smaller one adds sparkle. Leave the highlights white and fill the pupil dark: they are what makes the eye shine.
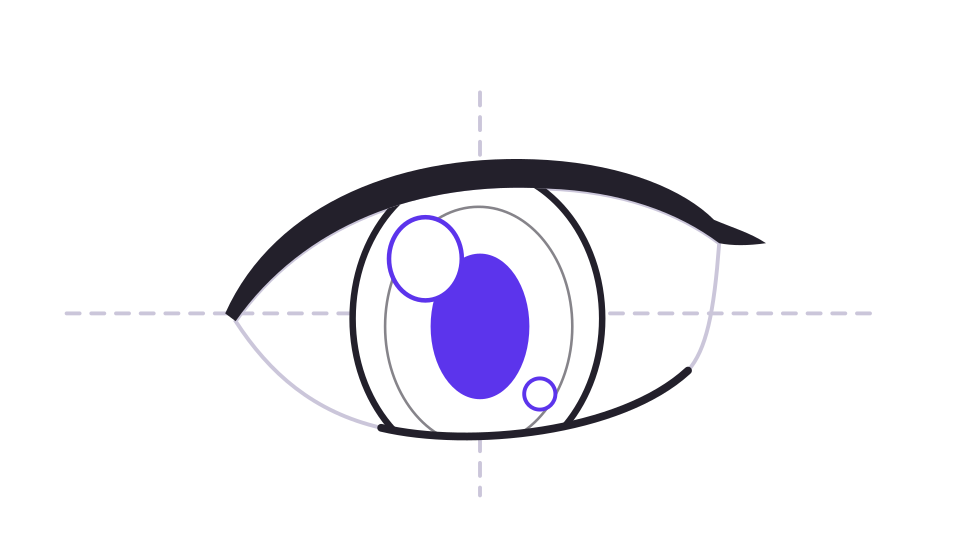
The dark pupil, a big highlight near the top and a smaller one. -
Step 6Shade the top of the iris
The upper lid casts a shadow on the eye, so darken the top of the iris with even strokes and stop in a soft curve. Leave the bottom light. That contrast between a dark top and a bright bottom is what makes anime eyes look glossy.
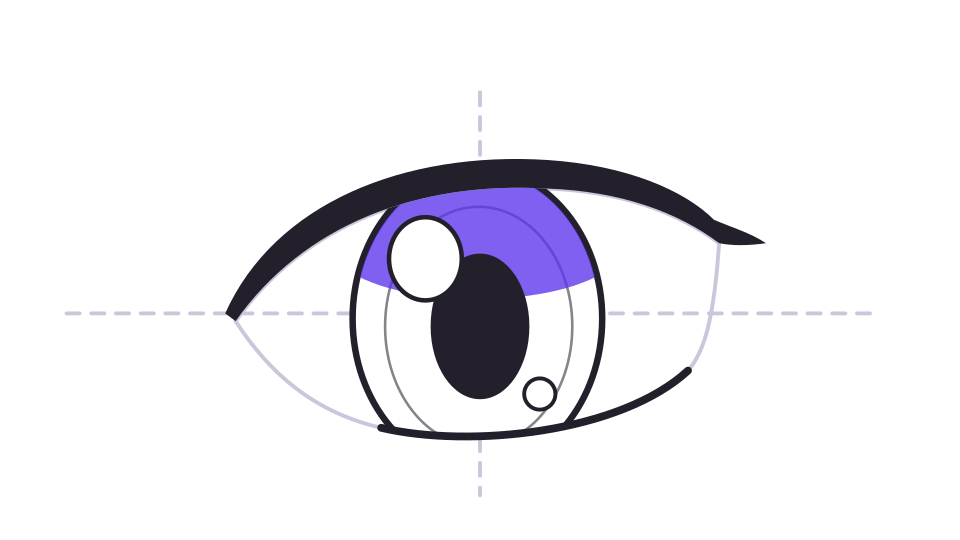
The shadow of the lid darkens the top of the iris; the bottom stays light. -
Step 7Add the lashes, the crease and the eyebrow
Add a few thick lash flicks at the outer corner, a thin curved line above the lid for the crease, and the eyebrow about half an eye higher, following the curve of the eye. Erase the guidelines, then darken the lines you want to keep.
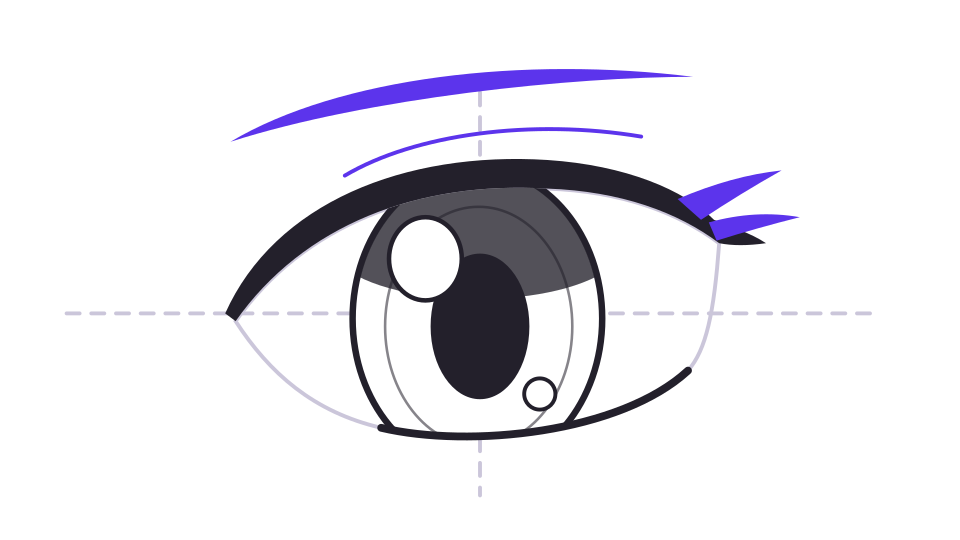
Lash flicks at the outer corner, a thin crease above the lid and the eyebrow.
How to draw anime eyes at an angle or from the side
When the head turns into a three-quarter view, the far eye gets narrower, because you see it at an angle across the curve of the face, and it moves closer to the bridge of the nose. The near eye keeps its shape, and both stay on the eye line, even when it tilts.
In profile, you see only one eye, shaped like an arrowhead pointing toward the nose, and the iris becomes a thin oval. Keep the eye set back from the bridge of the nose instead of placing it at the very edge of the face. For the full head construction from every angle, see how to draw an anime head from any angle.
- Front view: both eyes the same size, one eye's width apart, the pointed corners toward the outside of the face.
- Three-quarter view: the far eye narrower and closer to the nose, the near one unchanged.
- Profile: a single eye like an arrowhead, with a thin oval iris, set back from the nose.
How to change the eye style for each character
Once you can draw one eye, you can draw almost any character by changing a few things: the shape of the almond and of the upper eyelid, the size of the iris and the eyebrows. The construction stays the same.
The style of the eyes also says which kind of manga the character comes from. Keep the same eye style for every character on a page, or they will look like they come from different stories.
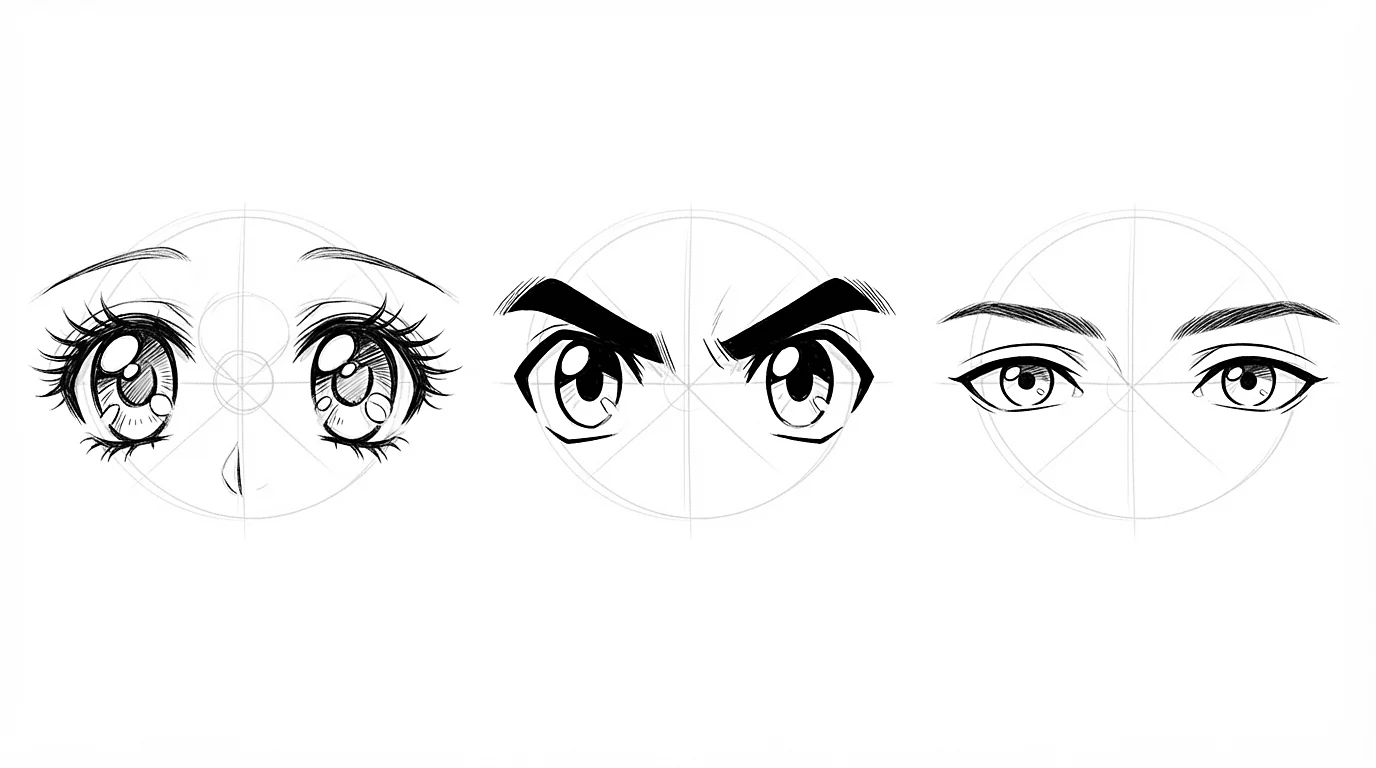
- Big and round: a high, round eyelid and a large iris, for a gentle or naive character.
- Almond-shaped: a calm, balanced eye, for a calm or confident character.
- Thin and sharp: a low, flat eyelid and a small iris, for a rival or a cold character.
- Shojo: very big eyes, taller than wide, a huge iris with several highlights and strong lashes.
- Shonen: eyes wider than tall, a thick eyelid slanting slightly toward the nose, a single sharp highlight.
- Seinen: smaller, more realistic eyes, a thinner eyelid with a visible crease and a smaller iris.
- Chibi and comedy: a black oval with one highlight, or even a single line.
Male vs. female anime eyes
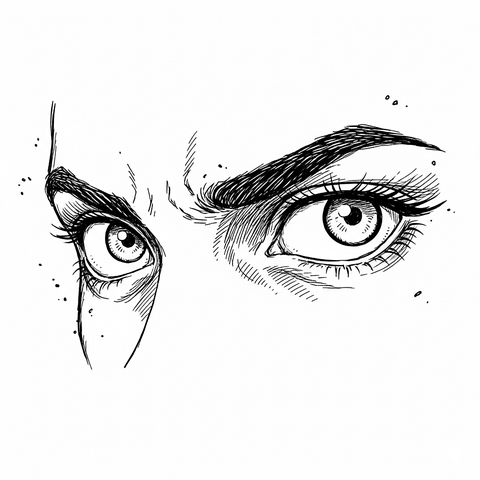
There is no strict rule, but most styles draw male characters with narrower eyes, a flatter upper lid, smaller irises and thicker, straighter eyebrows sitting close to the eyes.
Female characters often get taller eyes, a rounder upper lid, bigger irises with more highlights, heavier lash flicks and thin eyebrows set higher. The heavier the lashes, the more feminine or dramatic the gaze. Treat these as habits, not laws: a gentle boy can have big round eyes, and a fierce heroine can have sharp ones.
How to show emotion with the eyes and eyebrows
The eyes and eyebrows do most of the acting in a manga panel. Change the eyelids, the size of the iris and the angle of the brows together, and the same face can laugh, worry or rage. The anime expressions tutorial adds the mouth and the rest of the face.
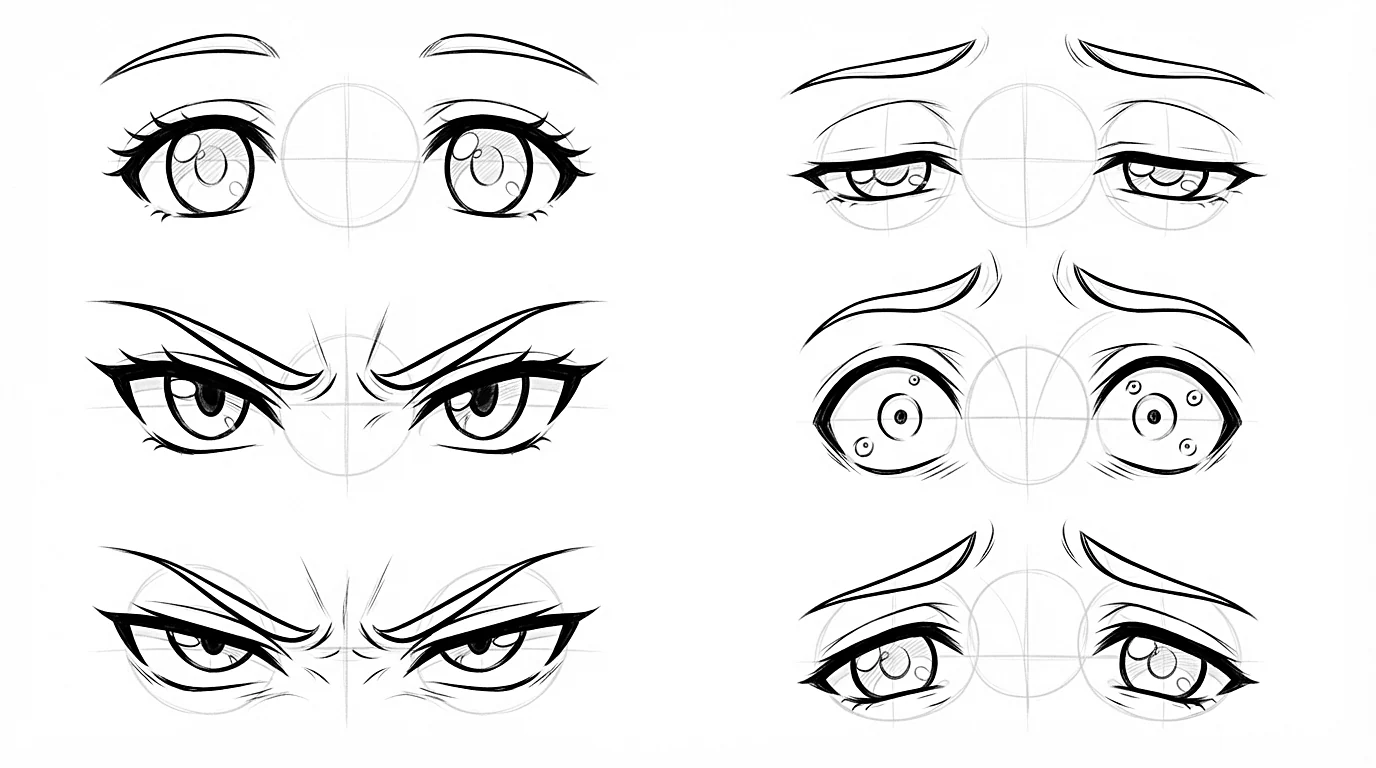
- The eyelid: high and round for a gentle or naive character; low and flat for a calm, confident or tired one.
- The size of the iris: large, the character looks young and open; small, tense, scared or threatening.
- Where the irises point: both look at the same spot. Move them together, never one without the other.
- The white of the eye: white showing under the iris looks calm; white showing above it looks scared.
- The eyebrow: low and close to the nose, it shows anger; raised in the middle, sadness or worry.
Common mistakes when drawing anime eyes
Most eyes that look wrong have one of these problems. Check your drawing against the list before you darken the lines, and flip it horizontally, in a mirror or on your phone: an eye higher than the other jumps out once mirrored.
- Starting with the iris: the eyelid gives the shape of the eye. Draw the almond and the upper lid first.
- Eyes that float: drawn without an eye line, one ends up higher than the other. Always place the guidelines first.
- Highlights that disagree: if they are not on the same side in both eyes, the character looks cross-eyed.
- A closed outline: a lower lid drawn all the way around makes the eye look stiff. Leave gaps at the corners.
- The wrong spacing: about one eye's width should fit between the eyes.
- A lifeless gaze: it usually needs a bigger highlight, not more detail.
Draw 6 pairs of eyes in 10 minutes, 3 from the front and 3 in three-quarter view, changing only one thing each time: the eyelid, the iris or the eyebrow. Then draw 3 pairs for 3 characters: big and round for a gentle one, almond-shaped for a calm one, thin and sharp for a rival. It is the challenge of day 2 of the SketchAI program.
Frequently asked questions
How do you draw anime eyes for beginners?
Build them in the same order every time: a lying almond, a thick upper eyelid over it and a short line below, a tall oval iris cut at the top by the eyelid, then a dark pupil, white highlights and a few lashes at the outer corner.
How far apart should anime eyes be?
On a face seen from the front, leave about the width of one eye between them. A bigger gap looks softer and younger; a smaller gap looks harsher or more grown-up.
Where do the highlights go in anime eyes?
Put the main highlight near the top of the iris, on the side the light comes from, and use the same position in both eyes. A second, smaller highlight is optional.
What is the difference between male and female anime eyes?
Male eyes are usually narrower, with flatter lids, smaller irises and thicker eyebrows. Female eyes are often taller and rounder, with bigger irises and heavier lashes. These are style habits, not rules.
How do you draw anime eyes from the side?
In profile you see only one eye, shaped like an arrowhead pointing toward the nose, and the iris becomes a thin oval. Keep it set back from the bridge of the nose, on the eye line.
Is there an app to practice drawing anime eyes?
SketchAI, on Android, has a free Manga eyes lesson and spends day 2 of its 5-week program on the eyes, and its Learn tab has Eyes drawings to practice on.
Keep learning
 Beginner
How to draw an anime face, step by step
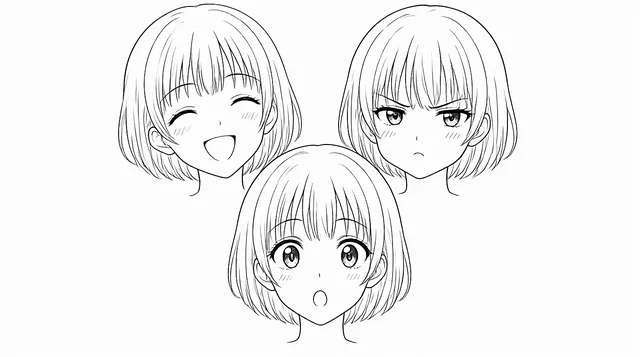
Build the head as a volume, then place the eyes, nose, mouth and hair on it, one at a time.
 Beginner
How to draw anime expressions, step by step
Build every emotion with the eyebrows, the eyelids and the mouth, then push it the manga way.
 Beginner
How to draw anime hair, step by step
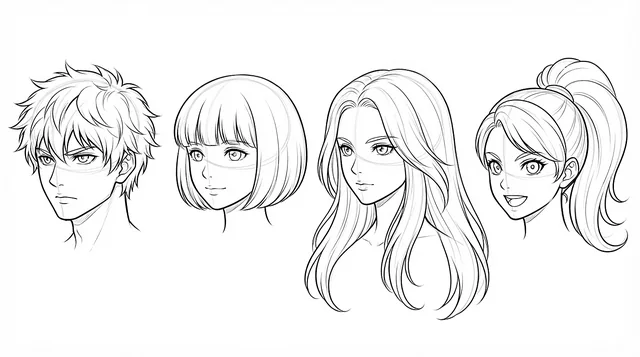
A mass around the skull, big locks from the parting, then spiky, long, curly and tied-up styles.